|

|__Home Page_|__PowerStation__|
_Drives__|_Siamese__|
_Amiga_|___Support___|
|
|
|
|
 About HiQ Ltd

HiQ News This Amiga World
|
JTS Drives (IDE 1gb & 1.6gb)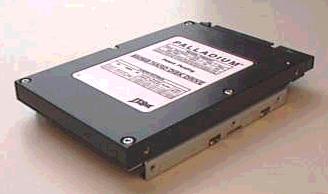
HiQ are pleased to announce the availability of the next generation of 3.5"
hard drives for the Amiga 1200 computer. The new 1gb drive from HiQ is a high
performance and low cost drive which is extremely easy to fit, requiring
absolutely no cutting or modifications of the Amiga 1200 case or shielding, due
to the slim design and the way it straddles the shielding without touching.
|
|
|
|
|
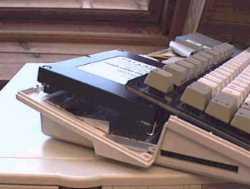
Even if the Amiga is touching it, it cannot short out the drive because of
the casing which encloses the entire drive unit. It can be fit within 5-10
minutes by the average Amiga user and comes fully prepped and formatted ready
for use. The drive will run on the standard power supply with upto one external
floppy but if multiple external floppies are used then perhaps a boosted supply
may be necessary. We have also added upto 25mb of PD utilities to get the
serious Amiga user busy and also some fun items for all of us including anims
and some demos. For further information please call or write to Steve at HiQ
ltd . For email send to steve@hiqltd.demon.co.uk |
|
|
|
|
1gb version with fitting kit
Only inc vat + £7 P&P.
1.6gb version with fitting kit
Only inc vat + £7 P&P.
Remember we offer free fitting to all personal callers |
|
|
|
|
IF YOU PURCHASED A JTS DRIVE THEN NOTE CHANGES LISTED,
CALL IF IN DOUBT.
Please note that HiQ Limited accept no responsibility JTS
Drivefor damage caused while using these instructions.
!! PLEASE BE SURE TO READ SECTION 4 AND GET THIS RIGHT !!
|
|
|
|
|
Instructions
1. Remove the 5 screws from the base of the machine and take off the top
of the case, be careful as there is a cable connecting the lid to the mother
board which must be removed.
2. Disconnect the keyboard or (JTS Drive) lay it over the back of the
machine which ever you prefer. The cable is replaced by lifting the white
connector sleeve, putting in the cable and pushing down the sleeve again. This
is a bit fiddly so be careful and mind your fingers.
3. (JTS Drive ignore) Remove the floppy disk drive, by disconecting the
two cables and unscrewing the two supporting screws underneath the machine.
4. (JTS Drive ignore) Now, you have to remove the top shielding of the
motherboard by lifting the tabs all round. The reason is that there is a piece
of shield that stops the drive fitting neatly (see Diag 1).
|
|
|
|
|
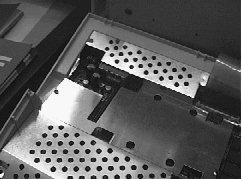
5. This can be cut out and do no harm. Just cut along the lines shown and
try not to leave any rough edges, use tin snips not wire cutters, you will also
notice on the left a piece of base shield now jutting upwards this must be bent
to the left so as not to touch the drive. Once this is done then you can replace
the sheilding and put the mother board and floppy drive back in the case, but
remember to connect the ribbon cable if you want it to work.
The drive ribbon cable is connected as such,
|
|
|
|
|
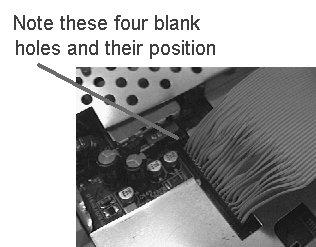
and the power lead is plugged into the original floppy drive connectors and
the Hard Drive lead is the new large 4 way power lead which only fits easily one
way round.The large 40 way ribbon attachs to the drive with the indents in the
plastic connector facing the ceiling and the arrow facing the drive power
connector.
6. Now the drive can be laid in place on the far left and to the rear of the
Amiga, with the connectors facing the floppy drive port and the circuit board of
your drive facing the mother board,
|
|
|
|
|
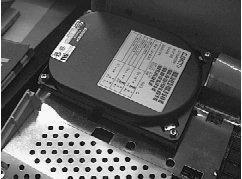
this is why you must have no pieces of rough cut metal touching the drive,
as it may short out. The drive should be OK in this position as it is lifted up
by the ribbon connector and so does not touch anything, however feel free to put
a piece plastic or paper under this although it is not necessary. (JTS Drive)
Sit the drive on the green cable carefully, and make sure the cable is not
stressed at the socket end. You will notice that the unit sits in the same place
as the diagram but straddles the shielding mentioned in part four, remember if
in doubt call us.
7. Now replace the keyboard and test the drive as it should auto boot
straight away, if it does then screw the case back together.
8. You must install the full Workbench system by opening the shell window
and typing these commands.
(a)Makedir dh0:fonts then use menu bar to add drawer called "Storage",
then create another drawer called "Locale".
(WB3.0)copy df0: all dh0: (Extras)copy df0: all dh0: (Please note that "0"
is a Zero!)
(Locale)copy df0: all dh0:locale (Storage)copy df0: all Dh0:storage
(Fonts)copy df0: all Dh0:fonts
Hope all goes well
Steve.
|
|
|
|